Fan Equipment Mesh Screen Cleanliness and Performance Effects
By GEORGE GAMES, PE
North East HVAC Engineering and Consulting
New Brunswick NJ
This article will discuss the effects of dirt on protective screens for fan equipment. One specific example will be used to address the adverse effects of screens caked with dirt.
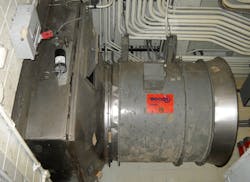
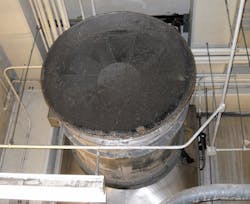
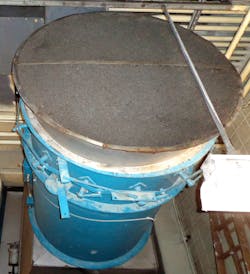
The example involves a vaneaxial exhaust fan, pictured on these pages, serving to ventilate two equipment rooms. Note how clogged the fan’s inlet screens are. It’s clear these screens haven’t been cleaned in a long time.
The fan I will focus on is one designed to exhaust 20k cfm of air and is 36 inches in diameter. Of note, the screen on the inlet suction side of the fan is a ½-in. mesh screen and it appears that most of the openings between the wiring are loaded with dirt.
Now, let’s see how detrimental this can be on fan airflow performance. To do so, let us first also establish some simulated fan system parameters to facilitate this discussion. Here, the side view starts with the fan exhaust on the left and runs to the fan inlet on the right. It includes:
• A protective inlet screen, 42 in. (3.5 ft.) in diameter, with ½-in. mesh spacing and 0.062-in. (1/16) diameter wire - the subject of this article;
• A short bellmouth inlet fitting that is about 6 in. greater in diameter than the fan diameter (this is not a true bellmouth fitting with a radiused contour, but one with a beveled cone shaped contour **);
• 36-in. diameter vaneaxial fan with airflow at 20,000 cfm;
• Duct transition from the fan discharge into the plenum. This transition fitting is extremely short and has a very abrupt divergent transition with large included angle (in other words, it is a high-loss coefficient fitting);
• A short, sheet metal plenum the size of the exhaust louver and about 12-in. long, with an isolation damper mounted within;
• An exhaust louver with bird screen on the outside of the louver;
• Let’s assume a partial system external static dP = 0.75-in. Wg. This value is fairly representative of a system with a louver, bird screen, plenum, abrupt diverging transition and bellmouth inlet; it includes inlet and exit flow losses. However, this dP loss value is only partial, as it excludes the losses for the protective inlet screen (which we will establish).
Note: A system effect for the fan’s discharge arrangement is overlooked here for two reasons: 1) To simplify the discussion; and 2) Because it is likely very difficult to find published system effect factors that considers the divergent transition piece attached to a short plenum with a damper installed in it, connected immediately to the exhaust louver. However, in practice, system effect (factors) are very important and must be considered when calculating a system’s pressure drop. You can have system effect factors on the inlet, as well as the discharge side of fan equipment.
Protective Inlet Screen Pressure Loss
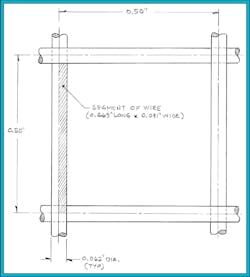
See Fig. 1 for a diagram of a close-up of one mesh square of the screen; we’ll use this diagram to calculate the free area of the screen. Thus, the free area between the wiring is:
Free Area = Area of Mesh - Area of Wiring Material
= 0.5002 - 4 [ 0.469 x 0.031 ]
= 0.250 - 0.058 = 0.192 sq in.
And for this screen the free area ratio (n), used to determine the screen’s loss coefficient, is:
Free Area ÷ Area of Mesh = 0.192 ÷ 0.250
= 0.768 or 0.77
A1 (the area of the screen) = pi x Radius 2
= 3.1416 x 1.75 2 = 9.62 sq ft
A0 (the area of the fan) = pi x Radius 2
= 3.1416 x 1.5 2 = 7.07 sq ft
Therefore the ratio of the larger screen area to the equipment area is:
A1 ÷ A0 = 9.62 ÷ 7.07 = 1.36
Please note: At the next step, to be accurate, we should interpolate between 1.2 and 1.4 on the coefficient fitting chart to find the corresponding Co , but to facilitate the discussion more quickly let’s round up and use 1.40; our result will be close enough.
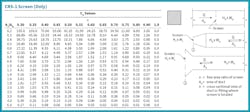
Referring to the coefficient chart for fitting CD6-1, we find that Co , the fitting’s loss coefficient, is approximately 0.20 based on using n = 0.77 ( interpolating between n = 0.75 and n = 0.80), and A1 ÷ A0 = 1.40.
Thus Co = 0.20.
Now to calculate the fitting’s pressure loss we need to find the velocity pressure, Vp , and multiply that with the loss coefficient Co. Velocity pressure equals air velocity (in fpm) divided by 4005, with this ratio squared; ie. Vp = (air velocity ÷ 4005)2 So, finding the air velocity first:
Air velocity = cfm ÷ area of screen (in sq ft)
= 20,000 ÷ 9.62
= 2,079 ft per min.
But note, this velocity doesn’t consider the wire material “in the way” of airflow (that reduces the “open” flow area and increases flow velocity). So to calculate true airflow through the screen, let’s use the “free area” ratio. Hence:
Air velocity (true) = cfm ÷ ( area of screen x n)
= 20,000 ÷ (9.62 x 0.77)
= 20,000 ÷ 7.407 sq ft
= 2,700 ft per min.
Calculating the fitting’s velocity pressure Vp :
Velocity pressure = (true air velocity ÷ 4005)2
= (2700 ÷ 4005)2
= 0.454 in. Wg
Now we need to multiply this result by the loss coefficient (Co) to find the fitting’s pressure loss, in in. Wg. Therefore:
Fitting loss = Vp x Co
= 0.454 x 0.20
= 0.091 in. Wg
Continuing, let’s add this screen’s loss to the partial system loss of 0.75 in. Wg to find the total external static pressure system loss. Therefore, total fan system external static losses are 0.75 + 0.091 = 0.841 in. Wg.
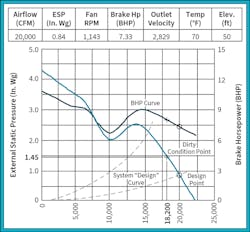
This is the total design external static dP for this fan configuration, from inlet screen to exhaust louver, including inlet and exit losses. This becomes your “design condition”. Thus, this fan would be selected to supply 20,000 cfm at 0.841 in. Wg. However, I would round to 0.84 in. Wg for the actual selection***. See Fig. 3 for the fan curve for this selection at 20,000 cfm of flow against an external static pressure of 0.84 in. Wg, at standard air conditions.
Estimating Reduced Airflow with a Dirty Screen
There’s one sure way of finding actual airflow through this fan with the dirty screen. It’s testing for airflow rate with testing equipment with the fan operating. This would be the most accurate manner but for the purpose of this discussion all I’m trying to accomplish is to show how dirty surfaces affect equipment.
Let’s assume all the openings are restricted with dirt caked on and the openings are on average 50% smaller due to the dirt accumulation on the wiring — sounds extreme, yes, but possible — look at the photos.
So, the free area ratio (n) now changes as follows.
Recall that our free area result found earlier was 0.192 sq inches. Half of this is 0.096 sq inches. So our new free area ratio (n) is
Free Area ÷ Area of Mesh = 0.096 ÷ 0.250
= 0.384
Note, this is approximately half of 0.77. Continuing, let’s round up from 0.384 to 0.40 to facilitate reading the coefficient chart more easily.*
Referring again to Fig. 2, the coefficient chart for fitting CR6-1, we find that Co is approximately 1.53 based on n = 0.40, and A1 ÷ Ao = 1.40
What we do not want to do at this point is to find the fitting’s loss using the fitting loss formula (used earlier).
Fitting loss (inches Wg) = Vp x Co
The reason for not using this formula now is that in order to find Vp we would have to guess what the air velocity through the dirty screen would be. How can you know, or estimate, by how much the dirty screen reduces airflow? It’s a guessing game.
The following method appears to be a reasonable way of estimating airflow loss, starting with calculating the new dirty fitting loss using the principle of proportions, then using the fan’s curve to estimate the corresponding airflow reduction.
Because the fitting’s loss (0.091-in. Wg) is proportional to its loss coefficient Co, we can use proportional ratios between the loss found based on one Co to the loss found based on another Co. Thus we can arrive at an estimated fitting loss for the new “dirty” condition. See below:
“design” fitting loss (in Wg) = “dirty” fitting loss (in Wg)
“design” Co “dirty” Co
Substituting what we know,
0.091 in Wg = ? in Wg
0.20 1.53
We find that the new “dirty” condition fitting loss is 0.696 inches Wg. This is an increase of 0.605 inches Wg of pressure over the “design” loss of 0.091 inches Wg - a 665 % increase in this component’s resistance.
Now we can use the fan curve to estimate the new reduced airflow based on the original design condition. See Fig. 3 for a fan curve for a 36-in. diameter vaneaxial fan delivering 20k cfm at 0.85 inches Wg “design” static pressure with air at standard conditions of 70° F. Note that this fan curve is similar to one for a vaneaxial fan shown in Ref. 2.
Let’s take the difference in the fitting loss between the design and dirty condition, in this case 0.696 - 0.091 = 0.605 inches Wg and add that to the system static pressure on the fan’s performance curve chart, then read the new airflow rate on the bottom. Our new system static pressure is 0.84 + 0.605 = 1.445, or 1.45 inches Wg. Plotting a point on the fan curve at approximately 1.45 inches of static pressure and reading down to the airflow scale, we get approximately 18,200 cfm; see Figure 3. This is a reduction of 9% of design airflow. This is an estimate of course, but this is not an insignificant reduction at all. Note also that motor hp used (Bhp) increases, which increases electrical usage, which in turn increases operating costs.
Recommendations
Design conditions are really “ideal” and temporary — they simply do not last. The moment a system is commissioned and put into service and operated, the “ideal” configuration diminishes gradually, and then continues to degrade over time, especially in the absence of regular maintenance and cleaning. Of course, any safety factor built into the system will provide margin to operate within or close to your design conditions for a longer period of time, but eventually without adequate cleaning and maintenance your system’s performance will drop [below the design condition] and underperform continuously thereafter.
Screens mounted on other equipment need to be located so access is adequate (to very good) for cleaning. A once per 2 or 3 month scrubbing of a screen should do, more frequently in dirty locales and where fans are constantly operating. Scrubbing and vacuuming the dirt off is suggested when the fans are off, otherwise if not vacuumed, when the fans are turned on the dirt will get sucked into the motor and onto downstream components.
In a case such as I show here, with no filtering of the air, the fan motor casings should be selected to be TEFC (totally enclosed fan cooled), so that the motor internals don’t get clogged with dust and dirt. Additionally, axial fan blades require wiping down on a regular basis as well.
Bird or insect screens should be mounted on the exterior surface of an intake or exhaust louver unless there’s full or near full access to it inside the building for cleaning. If the system is ducted inside, and the ductwork is connected to the louver, then the screen should be mounted outside (with tamperproof fasteners if needed). Otherwise if the screen is mounted behind the louver, getting to it via an access door mounted in the duct is problematic unless a large door is used. Of course, the larger access doors are more convenient, but they also have more perimeter length, that can be susceptible to leak more.
Obstructions - Dirty Screens or Other Types
The right fan inlet conditions are very important for all types of fans. Inlet blockages of any sort are detrimental, whether it’s dirt on a screen or a more permanent barrier. Obstructions must be avoided at all costs. Looking at the photos here, one sees that a portion of the screen is blocked whereas the other portion is clear. This also endangers fans.
The blocked area of the screen will restrict air into the fan blades in that sector of the fan and the fan blades will not load up as they should. This can lead to major fan problems and unwanted fan blade stresses. Inlet airflow into a fan should not be blocked in any way, otherwise you endanger the equipment. If you are a system designer, you should strive to have free airflow into a fan wheel whenever possible. Axial fans such as these are especially sensitive to uneven airflow patterns. Fan OEMs 4,5 usually recommend at least one fan diameter in front of an axial fan’s inlet to allow airflow streams to straighten out when being drawn into a fan.
As an example of the problems encountered when blocking or hampering airflow into inlets of fans, Ref. 3 discusses a power plant’s large Turbine Building ventilation exhaust system consisting of three 50% capacity large-diameter, vaneaxial exhaust fans, ganged three within an intake plenum. The plenum wasn’t originally designed and configured adequately. Its configuration lacked long enough straight paths into all three fan inlets, forcing airflow streams and patterns to become disordered on the way towards the fans and resulting in uneven airflow into two of the fan inlets.
The result was numerous fan blade failures occurring during the system’s life. Essentially the paths were too short and had too many turns such that the air couldn’t straighten itself out sufficiently before entering the two fans. After investigations and a CFD study were completed, the remedy was to reconfigure the intake plenum so that a longer path leading into the fan’s intakes would allow airstreams to straighten out more; with each fan having essentially a similar lead-in path. Turning vanes were also incorporated into the redesign of the plenum to aid in redirecting air to where it needed to go. It’s (highly) recommended reading for enlightening the problems with fan inlet configurations.
Conclusion
This discussion talked only about the inlet screen. It is likely that with any system, more surfaces besides the screen, would also collect dirt and further degrade the equipment’s performance. Thus based on the discussion it is obvious that dirty equipment and dirty surfaces greatly affect equipment and system performance. Regular cleaning of mesh screens (and other equipment such as air distribution grilles and diffusers, coil fin surfaces, etc.) is imperative to attain as close to “design” conditions as possible.
Whether the screen is a bird or insect screen mounted to a louver, or on equipment such as this, keep all your equipment screens (whether located indoors or outdoors) clean for the best performance, and for reducing unnecessary costly repairs and extending equipment life.
So, to keep systems from underperforming, take cleaning seriously as part of your maintenance program.
____________________________________________________________
* Normally I would interpolate here between n = 0.35 and 0.40 to find C that corresponds to 0.384, and would do the same when finding the “design” loss coefficient C. This approach is suggested when doing design work. But here to make the point and facilitate the discussion I simplify.
** Bell inlets are always recommended on axial fan inlets. Use a bellmouth type with a radius profile over a cone shaped profile for smoother inlet airflow streams and less energy losses. Note the elongated bellmouth fitting used on the new plenum installation described in Ref. 3.
*** This is the ESP (external static pressure) value you give to your equipment vendor for him/her to generate a selection for you, if you don’t have the selection software yourself.
References:
1. ASHRAE 2009 Fundamentals, Chapter 21, “Duct Design”;
2. ASHRAE 2012 HVAC Systems and Equipment, Chapter 21, “Fans”, Table 1 “Types of Fans”;
3. Bosynak P., Harris P., Airflow Sciences Corp., July 2015; “DTE Energy, Fermi 2 Turbine Building Ventilation (TBHVAC) Fan Failures”;
4. Greenheck Fan Corporation, Vaneaxial Fan IOM Manual, Document No. 452954;
5. Loren Cook Fans, Bulletin No. B51146-003, IOM Manual for VA/AVA/AF Fans.

